|
|
3 Simple Steps to Elegant Portraiture |
|
|
|
|
by Monte Zucker |
|
|
|
|
Take a
close look at ALL of the photographs in this article. All you see is ONE
light pattern. That’s it! No Rembrandt lighting. No broad lighting. No split-lighting.
No side lighting, or back lighting. Just ONE LIGHT PATTERN! How would
I describe it? It’s a light source that creates a three- dimensional
appearance on a flat piece of paper. The light comes from slightly above the
subject’s eyes and slightly to the side of the face. Both eyes are lit by
this main light. When the light is in proper position (shining into both
eyes) a catchlight appears in the subject’s eyes at either the 1 o’clock
position or at the 11 o’clock position, depending on whether the light is
coming from the subject’s right side or left side. The
tell-tale sign of the correct lighting pattern is that there is a small
loop-shadow that comes down and to the side of the bottom of the nose. One
side of the nose is in shadow. The shadowed side of the face is always
towards (closer to) the camera. The
relationship of the light to the face is universal. It never changes. As the
face turns, the light moves with it. Move the face; move the light. Move the
face WITHOUT moving the light and you’re in trouble. Then, you’re either
flat-lighting the face or turning the face away from the light. Shame on you!
Does this
always have to be the case? No. Of course not. But when you follow this
simple one-step lighting pattern you can always be certain that you’re in the
right ballpark. You’re lighting the face correctly, creating a
three-dimensional form on a flat piece of paper. I expose
the portrait for the main light and keep the fill light two f/stops under the
main light. Only TWO Poses! Simple
posing technique makes people appear to be unposed. People don’t object to
being posed. They object to looking posed in their pictures. If you can make
them look natural, they’ll be thrilled. If you can make them look BETTER than
they usually look in their photographs, they’ll be ecstatic! So, let’s work
on that. Everyone looks good when
posed in a BASIC POSE. Men and women.
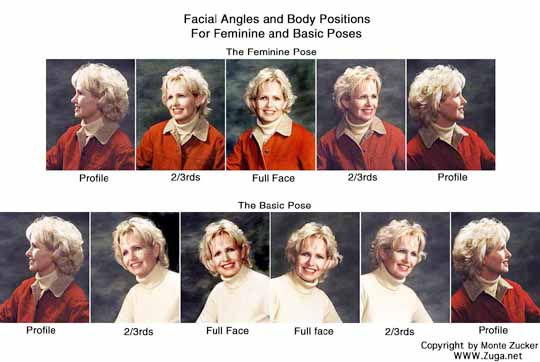
For easy
identification I have posed this woman in her turtleneck sweater for all of
the Basic Pose Illustrations. For the Feminine Pose examples she has put on
her red coat. The basic
pose works equally well for both men and women. Women with heavy chins/necks
should always be posed in this Basic Pose. Men, of course, should always be
posed in this Basic Pose when photographing them either full-faced or the
2/3rd angle of the face. Simply
stated, the Basic Pose is one in which the head and shoulders go in the same
direction. The head is tilted towards the lower shoulder, so that the head is
perpendicular to the slope of the shoulders. Since we are always turning
faces towards the light, the subject’s body and face should be turned towards
the main light for the Basic Pose. The rear
shoulder is lowered when the body is turned at a 45_ angle to the camera and
the subject leans forward (over the “belt buckle”) towards the knees. Basic Pose, Full Face to the Right
After
analyzing the face, if it is decided that you are going to turn the subject’s
face to the right, start off with the body turned in that direction to begin
with. That way, you will not have to move the light from one side of your subject
to the other when changing from full-face to the other two facial angles. For the
basic pose the shoulders are always turned at a 45_ angle to the camera. It
may be a good idea to begin by positioning your subject so that one shoulder is
going directly into the lens. Then, when you extend the far elbow out to form
a base for the composition, the body will automatically fall into a 45_ angle
to the camera. Notice
how the head is tipped towards the low shoulder and facing directly into the
camera. I usually place the height of the lens for all head and shoulder
portraits slightly above the eye level of the subject. Then, while looking
thru the lens I have the subject raise or lower the chin to see the normal
perspective of the face. This is the ONLY way to know exactly what the camera
will be recording. No surprises! The
portrait is usually cropped, so that if you were to draw a line straight down
from the chin, there is an equal amount of the subject’s body on both sides
of that line. Basic Pose, 2/3rd View of the Face to the
Right
Leave the
body exactly as-is, still at a 45_ angle to the camera. Turn the head until the
eye on the far side of the face comes almost to the edge of the outline of
the face. This is the 2/3rd view of the face. It slims
the face down considerably from the full face position. It brings out the
cheekbones. It is usually the most flattering view of most faces. The head is
still tipped to the lower shoulder. The only difference between the
positioning of the light between photographing a person in full-face or the
2/3rd view of the face is that the light must move farther around the subject
to maintain the same light pattern as before. The eyes
are usually centered in the eye sockets as seen from camera position.
Occasionally, it might be good to position a woman’s face at this angle and
still have her looking back towards the camera. It doesn’t work for a man. If the
bridge of the subject’s nose is fairly high, it may begin to hide some of the
eye on the far side of the face. Do not let this happen. Bring the face back
towards the lens, until the nose does not interfere with the full view of the
far eye. Be
careful not to let the tip of the nose come too close to the edge of the face
or cross through the outline of the face into the background. When that
happens one gets a very distorted view of the face You create little pockets
of flesh between the upper lip and the nose, as well as small pieces of the
face between the upper part of the nose and the eye. Basic Pose Profile to the Right
There is
no Basic Pose when you’re photographing a subject in profile. The pose for a
profile is always the Feminine Pose. We’ll discuss this later in this
article. Basic Pose Full Face to the Left
This is
the same as the full face in the other direction. This is the way to begin,
if you know that you are going to be turning the subject’s face to his/her
left. Basic Pose, 2/3rd View of the Face to the
Left
Same as
in the other direction Profile to the Left
As you
can see, the profile in either direction is always in a feminine pose,
whether it’s for a man or a woman. You need the body at a 45_ angle to the
camera, so that it can support this view of the face well. The Feminine Pose
The
Feminine Pose is one in which the head is turned and tipped towards the high
shoulder. The woman’s body is turned away from the source of light. Her head
is turned back to the light. The light is placed to get into both of her
eyes, creating our singular light pattern, regardless of what angle of the
face is to be photographed. Slim
women look elegant in the Feminine Pose. Women with a heavy jawline should be
posed in a Basic Pose, rather than in a Feminine Pose. A Feminine Pose would
accentuate the heaviness in the neckline area and be very unflattering. Everyone
(men and women, alike) should be posed in the Feminine Pose for a profile
picture. That is the only way in which you can show enough of the body to
properly support that view of the face. The
high/low shoulder is achieved by the lean of the subject’s body. The body
leans slightly forward (over the “belt buckle”). At the same time the body
leans in the opposite direction from the way the head is turned. Thus, if the
subject turns her/his head to the left, the body leans slightly to the right.
Remember,
the head turns and tips to the same shoulder. Some people inadvertently
turn the head to one shoulder, while tipping it towards the other. Not good! Let’s
begin studying the feminine pose by looking at the full face portrait. Her
body could really be turned in either direction. The deciding factor would be
the choice of which direction you will be turning her face for the 2/3rd view
and/or her profile. In this illustration her body is turned to her right. The
main light is coming from her left. It’s obvious, then, that she will be
turning to her left to continue the photographs from this full face position.
When
turning a head for the Feminine Pose one should be careful not to turn the
face beyond the point where the cord in the neckline would stand out too much
and distort her neckline. If one observes the correct body/shoulder position
for each view of the face in the Feminine Pose, this will not happen.
Thus, for
this full face picture the woman’s body is turned to approximately a 45_
angle to the lens. At this point the relationship of her head to her
shoulders becomes solid. If she turns in any direction, the relationship
between the head and shoulders remains as-is. Now, take
a look at the same exact pose - viewed from a different perspective. This is
the 2/3rd view of a woman in the Feminine Pose.
Her body
for this head and shoulder portrait is turned straight into the lens. This is
the ONLY time that it’s advisable to turn a person’s shoulders straight
towards the camera. For this
picture I chose to turn her body and face. Then, I moved the light slightly
to her left to retain the same lighting pattern on her face. I could
just as easily left her as she was and moved the camera position to where my
lens saw the 2/3rd view of her face. In this case, however, I would have had
to move the background, too. In a studio environment it’s much easier to move
her and then the light, rather than just changing camera position and having
to worry about the other details that would undoubtedly have to be modified
by changing the location of the camera. Finally,
for her profile you can see where her body is once more at a 45_ angle to the
camera and that the light has once more been moved to retain the same light
pattern.
Now,
let’s study the 2/3rd view of her face and her profile facing in the other
direction.
Of
course, the same things apply here as when she was turning her head to her left
shoulder. The only difference is that the main light is now coming from her
right side. The
shoulder position for the 2/3rd view is towards the lens, while the body
turns once again to a 45_ angle for her profile. She’s like a statue. Move
any part of the pose and the entire body moves with it. Wrapping
it all up in a neat package, let’s now look at the whole concept put together
for you. It would probably be a great idea for you to save these
illustrations and refer back to them as often as possible. Certainly, this
would make you appear to be the most knowledgeable person in your area about
posing and lighting for portraiture.
Where do you go from here?. None of
this, probably, will sink in simply by reading this material. It is
imperative that you work with it and refer back to these illustrations while
you’re creating portraits and after you’ve done them. Eventually, you’ll find
that these simple 1, 2 and 3 basic steps to fine portraiture will create the
platform from which you can launch in any direction you wish to go. |
|
|